

Sunday, November 18, 2012
Beads of Courage Auction
I have good news and good news........................which do you want to hear first? The good news? OK - here it is - the auction total to date is over $450.00 - which is a YIPEE, YAY, AWESOME moment. One hundred percent of the proceeds from this auction go to the Beads of Courage Program which is currently implemented in over 140 Childrens Hospitals in the US, Canada, New Zealand, Japan and the United Kingdom. Don't take my word for it, go read all about it - and then go bid on a bead!
 Which brings me to the second good news - there is still time to get your own one of a kind, handcrafted art charm. I have showcased some of them on my blog here, but there are lots more to choose from. And it is for a REALLY good cause - come on guys - do this for the kids!
Tuesday, November 13, 2012
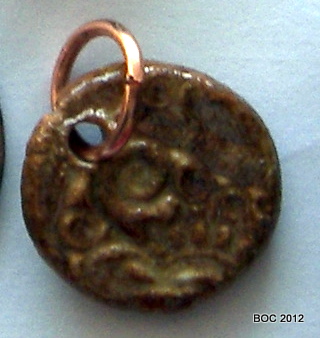
Beads of Courage Art Charm Auction
These are the wonderful charms I received in the Beads of Courage Art Charm swap - which, incidentally, are available for purchase here.
 |
| Handmade Art Charm by Emma Todd |
 |
| Handmade Art Charm by Stephanie Haussler |
 |
| Handmade Art Charm by Lori Greenberg |
 |
| Handmade Art Charm by Susan Kennedy |
 |
| Handmade Art Charm by Charlene Jacka |
 |
| Handmade Art Charm by Marsha Neal |
 |
| Handmade Art Charm by Natalie McKenna |
 |
| Handmade Art Charm by Alicia Marinache |
 |
| Handmade Art Charm by Renetha Stanziano |
 |
| Handmade Art Charm by mrs beadsley |
All of these charms and more are available on ebay here - just in time for making Christmas gifts. Consider purchasing one (or more) of these charms to benefit a REALLY worthwhile cause.
Read about Beads of Courage - then go and buy a charm!
Thanks :)
Monday, November 12, 2012
Charm Reveal!
Today is the reveal day for the Charm Swap. The theme this year is "laugh". The charms I created represent a little girls tea set - with the white and blue enamel on the penny creating an almost delft pattern when fired - and the single pearl on each penny represents the string of pearls she would wear to her dress up tea party. While the thought doesn't translate directly to laugh, the path from being happily at play to laugh is a natural one.
Using pennies, I sifted a layer of off-white on the penny, torch fired it, then fired a second layer of the white. Using a handmade template, I sifted a light layer of midnite blue on the penny and fired for the last time.
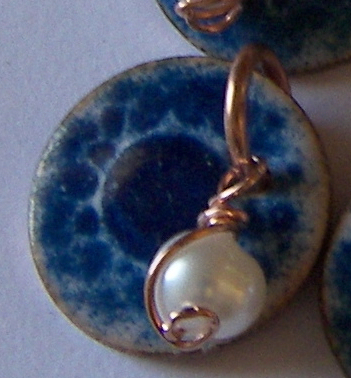
Once the enameled pennies were cleaned and buffed I wrapped a freshwater pearl with some copper wire and added it to the copper jump ring- a little bit of dress up for the tea party.

I made 11 charms in all - 10 of which will be swapped and the 11th will be auctioned off for Beads of Courage - please check out the auction here and then go check out some charm eye candy!

And a big thank you to Jennifer for hosting this swap. It was my first and a great deal of fun.
Saturday, October 20, 2012
How *I* enamel Pennies :)
After reading about (and seeing) torch fired enamel on copper,
I wanted to give it a try. The one thing
I had plenty of was pennies, and since I had already been using pennies in my
jewelry for a while, I decided to try enameling them.
I already knew that the pennies with the highest copper
content were the ones that I had to use (pennies minted after 1982 are only
clad in copper – they are mostly zinc which melts when torched) so I gathered
all my pre-1982 pennies and got to work.
The first step is to drill a hole in the penny – determine
how you want to use the penny, mark a pilot hole (I used a scribe - small tap with a hammer - just enough to make a mark)and then drill (I use a 5/16”
titanium bit in an electric drill).
Using a file, make sure the penny is free from burrs, if you want it
domed now is the time to dome it, and
then clean the penny (I use a bath of lemon and salt and then a rinse with
clean water).
 |
| lemon and salt in first jar, plain water in second and vinegar and salt in third - also keep an empty jar handy - you will need something to pout the lemon/salt or vinegar/salt into before putting pennies in the water |
Make sure the penny is really clean – you will have problems with
the enamel if not.
I gathered all my supplies together – a tripod, screen to set
the penny on,
 |
| this is not the original screen that came with this set up (that I have totally modified from a lampworking kit) |
a fiber blanket, a torch, a sifter and some enamel powders. The screen sits on the tripod so the penny
can be fired from below so make sure when you set your work area up there is
enough room to get the torch under the tripod.
Once the penny is clean, put it on the screen and you’re
ready to sift your first coat of enamel powder on it. There is a spray adhesive
you can use (Klyr-Fire) that helps to keep the powder on the penny but as I
take my pennies right out of the water rinse and use them immediately, the
enamel is held on the penny by the water. Sift an even coat of enamel powder on
the penny,
 |
| this is what I use to sift the emael on - it's a large cotter pin and a faucet spout fitting - handmade diy'd! |
thick enough that it coats the penny. I keep a piece of cardboard under the screen
to catch the powder that falls during this process – you can use thick magazine
pages or even glossy photo paper – the thicker the better. Save after each application – some enamels
are opaque and some are transparent and they don’t mix well. Also, mixing your colors together will net
you a muddy brown color when fired……..most of the time.
 |
| these little tins came from the bridal section of some store - my wonderful brother and sister found them for me - it's really good having the enamel in a container that is fire proof |
Turn the torch on (I use a MAPP gas torch – with a standard
issue plumbing tip on it) so the flame is about 6-8” long – and while you are
doing this remember that the hottest part of the flame is about a quarter inch
in front of the blue cone - and start heating your penny from underneath. Hold the flame about a quarter to a half inch
from the back of the penny and apply even heat.
The penny will turn dark, and then you’ll see the enamel start to melt
onto the penny.
It melts in three stages
– the first stage is the “sugar stage” where you can see it’s melted but it’s
still noticeably granular; the second stage is the “orange peel stage” where
the enamel is now an orange- red and dimpled much like the skin of an orange;
and the last stage is the molten liquid stage – the entire penny is orange-red
and shiny – there are no crystals or lumps and the enamel looks like liquid on
top of the penny. Once the molten red
stage is reached, I count to five just to make sure the enamel is completely
melted.
At this point, take the flame away from the penny, sift on
your second coat of enamel powder and fire again. It is up to you and what you are enameling
how many coats of enamel powder you use – sometimes I use two and sometimes I
use three.
Once you are done applying the enamel, put the penny in the
fiber blanket (or you can use warm vermiculite) where it will stay until it’s
cool. This is an important step since
the copper and the glass cool at such different rates – if it’s not properly
protected while cooling down you will lose the enamel off the penny.
Once the pennies are cool to the touch, pickle them (I use a
vinegar/salt pickle) and then clean remaining fire scale off using polishing papers
or a dremel tool.I hope, if you try this torch fire enamel technique, that you get as much joy out of it as I do. And please do let me know if you have any questions.
Wednesday, October 17, 2012
The Great Penny Debate


I love my blog. I love that I can go to my studio, attempt a new skill, add to an existing skill or just play for a day, and then share my learning experience with other interested individuals. For the most part this is the tone of each post - to share what I have learned or what I have created, and to keep it all positive and supportive - with the occasional foray into cute pet pictures/posts or landscape photos that I can't help but share - but hey, who doesn't love some of those?! This blog is MY place. I get to set the tone of the posts. I get to decide what I share and how I want to say things. Don't get me wrong.....I love comments. I love hearing from readers - what they are doing, what they have learned, what they are taking away from my experiences............the good and the bad. I do not delete comments on a whim.......after all there is more than one side to a story - any story - and I am not adverse to having it pointed out to me.
However, what I don't want, and what I will not post are negative comments - those that have a slight menacing tone, or are crafted to show how I am somehow 'less than' because they are so much 'more than'. I say all this as a reply to one particular commenter - a commenter that gets a little snarkier with each comment (that I will not approve) - and in spite of the fact that I don't post his/her comment, keeps commenting.
In answer to the comments they keep making, here is my answer:
"Section 331 of Title 18 of the United States code provides criminal penalties for anyone who fraudulently alters, defaces, mutilates impairs, diminishes, falsifies, scales, or lightens any of the coins coined at the Mints of the United States. This statute means that you may be violating the law if you change the appearance of the coin and fraudulently represent it to be other than the altered coin that it is. As a matter of policy, the Mint does not promote coloring, plating or altering U.S. coinage: however, there are no sanctions against such activity absent fraudulent intent"
'Nuff said.
Thanks for listening!
Tuesday, October 16, 2012
Checking In
As is apparent to all, it has been a while since I posted a new blog entry. As the saying goes, life has gotten in the way (in a big way, but I digress) - I moved and didn't have a place to create, then I moved again and made a place to create and then I lost my hard drive and thus all my files and most importantly my sign on information for my blog. You know how it is......you go along letting the computer remember things for you - or worse, you stay signed in (thinking to yourself, "oh, I'm the only one that uses this computer, what could it hurt") and then your hard drive fries and you realize you know nothing, you forget your password......or your username......or both and you can't sign in. So, for the tenth (or twentieth) time you create a new password and YAY sign in. Which I just did. Only to see that I have 12 comments from 12 lovely people waiting patiently for me to see them and to answer them. Which I will do, I promise. And, thank you for taking the time out of your busy day to comment!
Subscribe to:
Posts (Atom)